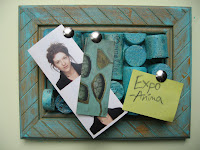
Here's a classic idea for a pinboard. This is a small version but you could choose to make it bigger. I've provided easier options for the classroom but you do need to allow time for the glue to dry. This is a great project to do at home and looks effective, works well and could be given as a gift.

Materials
-Corks (around 10 for a small board, 18 for A4 size, depending on width you cut the corks)
-Paint in 1/2 colours (and paint brush, container, newspaper to paint on)
-PVA white glue
-A frame (this could be an actual frame or clipframe)
*Clip frames are inexpensive, but if you prefer to keep it really simple, you could use the lid of a shoebox or a thick piece of cardboard
-Scissors
Stage 1
-Cut the corks with scissors (this would be difficult for a child so I suggest an adult does this)
*If you cut a cork in half, it's roughly the same depth as the depth of a full cork on it's side, so the result is more even ..I cut the corks at different depths for a more random look
Stage 2
-Position the cut corks to make sure you have enough pieces to fill the pinboard. (Remove the backing from a traditional frame, remove the glass, put back together and draw the inside line of the frame so you know where you can place the corks. Do exactly the same with a clip frame, remove the glass, but after mark where the metal clips are and don't place a cork there)
Stage 3
-Paint the corks (You can water the paint down and it doesn't matter if you miss parts)
*Also you could save time by painting the backing of the frame/board too
-Allow to dry
Stage 4
-Add PVA glue to the backing of frame/board
-Position the corks in the glue (put the frame part on first if using a traditional frame)
-Allow to dry
-Once the glue is dry, use the same paint to fill in the gaps between the corks
(This could be done earlier in Stage 3)
-You can also paint the frame in the same colour with watered-down paint (optional)
And that's it. Use drawing pins to attach notes, photos and info.


No comments:
Post a Comment